Author Archives: sewpro

About sewpro

Lori Johnson Manfredo grew up watching her Mom sew the most incredible doll dress collections and skating costumes; none of which ever fell apart when play or sport got rough. When Lori went ahead and made her own prom dress, she was hooked and has been sewing ever since.

Make a Custom Air Conditioner Unit Cover

Making a custom air conditioner cover is often easier than hunting for a good replacement in stores. As a shopper, I found all sizes of barbecue covers, but nothing small enough for an a/c cover.

Making a custom air conditioner cover is often easier than hunting for a good replacement in stores. As a shopper, I found all sizes of barbecue covers, but nothing small enough for an a/c cover.

Start with a waterproof material. Good choices are the material used for tarps, tents, lunch-bags, awnings or outdoor upholstery. You will find plenty of options, but it absolutely has to withstand rain and cold temperatures.

Also, when you are choosing a fabric, buy something sturdy enough to withstand the perforations of sewing and that won’t rip away during wind storms.

For a typical a/c unit, I estimate about 2.5yards off a 54″ fabric bolt.

Carrier ac unit

I modified a large plastic barbecue cover to protect my air conditioner unit over winter. I measured height to include the stone base.

For my custom air-conditioner cover, I re-purposed a standard barbecue cover made from woven polyester (plastic with a surface grain). Luckily, the material was wide enough that I could make a  pattern in two pieces. One piece covers top and back. The other wraps both sides and the front. Pieces are seam tape sewn together, with at least one open slit to accommodate the hose and electrical connection to house.

ac cover slits for hose

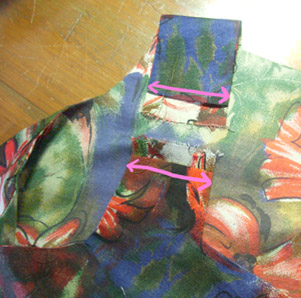
Remember to leave room for hoses and electrical cords. This back vent closes up with velcro tabs sewn in along the seam tape.

ac cover velcro closure

When you assemble the pieces and finish the edges, tuck velcro tabs in under the seam tape.

To make the seam tape, I cut 2″ narrow strips from the plastic fabric. In total I needed 3.5m to join both pieces and anchor in the velcro tabs at back vent. I would need closer to 8m If I wanted to edge seam along the bottom and do both sides of open slits at back. If you want, you can create a casing along the bottom edge and insert some elastic ties for extra wind-proofing.

Seam Taping Tip: Start sewing in the middle of the front panel and leave the tape trailing at both sides. You can sew up these loose tails when you reposition your cover to sew down sides. And add short velcro tabs to provide a snug fit.

ac cover with snow

So when winter winds start howling, that’s our signal to protect outside patio furniture, barbecues and air conditioning units. If your original cover is missing or wrecked and you cannot find a suitable replacement in the local hardware store you may decide to make your own

Round Patio Tablecloth with tassel trim

round tablecloth

Round is not such a difficult option for a patio table. Really it’s just a matter of trimming your fabric and sewing in a hem … of course, it will be a long hem, but worth the trouble!

unfinished tablecloth

Before: A square tablecloth is ok for a round patio table, but I wanted a neater look.

Cut a quick circle: Fold twice and draw a curved edge

Fold a big square of fabric in quarters and mark an arc along raw edges from centre point out. You can cut thru all layers at once if the textile is not too thick.

add tassel trim

Open up the circle, and hem up with tassel trim. It took 4 yards of trim to get around this 62″ wide tablecloth. I ironed a hem up and pinned the trim all around in place. The first pass of stitching caught the upper edge of trim and the raw edge of fabric. The second pass caught the low (tassel) edge of trim and the fold edge of fabric.

Widen a Narrow Bolt of Fabric with a side panel

In order to get a decent hang-down off my 48″ patio table, I needed to add an 8″ panel to the side of my 54″ blue checked fabric.

I added the panel using a flat fell seam, so both sides looked finished. (The panel is small checks.)

I added the panel using a flat fell seam, so both sides looked finished. (The panel is small checks.)

Amount fabric required:  

Tablecloth fabric:  2 yds

Tassel Trim: (for 48″ table) – 4 yds

How about a hole for the umbrella?

That will require some sort of a slit and an overlap. Next project.

Next tablecloth will need a centre opening for my patio umbrella

Next tablecloth will need a centre opening for my patio umbrella

Missoni zigzag shirt

Love lacy fabric? Try it with a lining (maybe a contrasting shade?) to make a terrific summer top!

Here’s my sleeveless blouse using a very open weave Missoni knit. I put in a thin, tricot (stretchy) lining in muted blue. The colour picks up the steely tones of the zigzag design.

Missoni knit shirt

The lining is so comfortable because the outer shell alone would have felt flimsy and was kind of sheer.

Begin by Tracing a pattern on bristol board

Use a top I that fits well, that way there is minimal adjusting. I just laid an old shirt down and traced two pieces: a front and back and added my 5/8″ seam allowances all around.

Cut a front and back of the lining, and an identical front and back of the Missoni fabric with the same cardboard pattern.

Simply sew up the left and right sides of the lining, leaving shoulders open. Do the same with the front and back of the outside fabric.

Now insert the assembled outside, into the assembled lining (which is inside-out). Be sure the side seams face away from each other. They will face each other when you turn the blouse right-side out. And snip the curves so everything will lay flat.

sew lining to outside

Baste and then stitch: along the back neck edge, along the front neck edge, and under the arms to within 5″ of the shoulders. Hold off sewing up the shoulder seams.

add lining to top


Sew the shoulder seams in a continuous path


Open the fabric at the shoulders and pin the lining and the outer shell all in one continuous path. Now a single shoulder seam can be turned and finished by hand.


Missoni Top front and back


Amount fabric required size 14:  


  • Outer fashion fabric – 1 1/8 yd
  • Inner lining: 1 1/8 yd

Sleeveless lined blouse

polkadot blouseRayon had the perfect drape for this sleeveless blouse with flounce; just one of the five co-ordinating wardrobe items you get in Butterick B5965. The blouse is lined, adding substance to a fine summer fabric. I found a mauve tricot knit to match my polka dot print. Alternately, you can make a dress from Butterick’s pattern, which is as simple as extending the flounce to a knee length. Continue reading

Quilted couch pad slipcover

How about this checkerboard seating for a living room couch?

Protecting the seat only, it’s a happy harmony of slipcover and quilt. And that’s a good place on the sofa-coverings spectrum. Every fitted slipcover I’ve ever attempted looked sloppy and rumpled even before a movie and popcorn night. And the alternative, a precision perfect quilt, seemed work too fine to be parking my tush on.

couch quilt

Dark colours on this quilted couch pad contrast with the light tan sofa fabric. A simple nine-patch design is created with two red tones and two grey tones. Randomly alternated and yarn-tufted, the result is an overall vintage look.

Previously, coverlets folded in half were too short at the ends and too wide to the back. Now my red and black cover is custom fit from armrests to cushioned back. Blocks are seven inches square. There are three rows of ten across, for a total of 30 squares.

quilt sandwich

Stacking order: First the backing is taped flat on a large table. Next, the batting is laid down. (Here I’ve used two layers to add loft). Then, the assembled patchwork is placed on top. The bundle is machine sewn all around the edge.

centre marks

Before you stack, mark the exact centre of the backing on all four sides. Do the same on the pieced top. When you prepare to sandwich the layers, be sure to line the marks up perfectly.

tufted quilt

Here the layers have been basted in a sunburst pattern to keep everything taut and flat. I believe the same success could be achieved with curved safety pins available at most good quilting stores. The centre of each of the 30 blocks is tufted with yarn.

trim batting

The batting is trimmed 3/8″ to the machined stitch line, and the excess backing (roughly 4 inches all around) is ready to be folded to the front for a mock blanket edging.

Amount fabric required for three seat couch coverlet:  

Do choose fabrics that will wash well. No need to pre-wash the batting.

Backing: 2.2 metres of black broadcloth or similar from a 45″ bolt

Pieced top = 30 squares: 2 metres total

1/2 metre each: dark grey, black, deep red, red with small pattern.

And black yarn for tufting.

Always have a certified nap professional (I use a standard housecat)test your quilted sofa slipcover pad when finished.

Always have a certified nap professional test your quilted sofa slipcover when finished. (I use a standard housecat.)

Mock Knit Fabric Blouse

This isn’t just a flat print of a knit. This material actually has a raised profile; it has the illusion of knitted ribbon!

shirt collar

Here is the Butterick B5218 blouse. I used solid black broadcloth on the collar to accent the main, mock-knit fabric.

Interesting, but a real challenge to send through my sewing machine. Consequently, I ended up hand-sewing some bits, such as pockets and sleeve hems. I just didn’t like the deep impression the machine stitches left on the material’s delightful terrain.

Once satisfied that the fabric would not fray, I left the seams unfinished (no worries). Unfortunately, the needle jammed and skipped, so I placed stiff, tearaway tissue on both top (against presser foot) and bottom (against feed dogs) and that sent it through smoothly.

pattern marks in coloured tape

It was impossible to chalk in pattern marks on such bumpy fabric. I ended up cutting shapes from painter’s tape instead.

In places where I did choose to hand-sew, for instance the sleeve hems, I marked a very straight path with pins, 5/8″ from edge, and followed that with close, even stitches. The pockets were also hand sewn in place. That was a longer path than the shoulders, but required less precision and the stitch length was longer. (Unless you plan to keep sand in your pockets, the seams need not be finished to micro-perfection.)

alter pattern shoulder

I narrowed the drop shoulders by cutting both front and back pieces diagonally from shoulder notch down to the armhole notch. Then I lapped the slice at shoulder.

In the end, I like the drape of my final blouse. All-season suitable, it combines a wintry, knitted look, minus the bulk.

Amount of fabric required for short-sleeve Butterick B5218: one and a half yards main colour, and 1/3 yard of contrasting black broadcloth for collar.

Amount of fabric required for short-sleeve Butterick B5218: one and a half yards main colour, and 1/3 yard of contrasting black broadcloth for collar.

Easy Sleeveless Blouse with Facings

A great way to welcome spring is to make something in a floral print. Hello colour, so long snow! I found a red, green & blue cotton/linen blend for this sweet sleeveless blouse that sews up in four, easy pieces. Front, back and facings for both.blouse outdoor_w_hoseFacings are usually just a couple of inches wide and sit inside the garment along the neckline and armholes to make the edges neat and sturdy.
Normally they are a mirror image of the pattern contours they line, as in the photo below.blouse_with_facingsOne thing I like about good old burda patterns is they fit without too much pattern tweaking. Here’s how burda 8109 sews up in 6 simple steps.

  1. Sew darts in front.
  2. Join front and back together at left side.
  3. Install a separating zipper up the right side.
  4. Sew the front facing to the back facing at side.
    Install the facing by sewing along neck edge and along both armholes. Even if you have to adjust the seam allowance width here, be sure to keep all four un stitched shoulder edges (2 fronts and two backs) a consistent width because you must mate these up to make smooth armholes and neckline.
  5. Flip the facing to the inside.
  6. Sew up bottom hem.
f you modify the shape of your front or back in a pattern, remember to make the same changes to their facing pattern pieces.

If you modify the shape of your pattern front, remember to make the same changes to their facing pattern pieces.

Back in January, I determined to make a dent in my (big) stash of unopened patterns. To date, I have tackled three including this last one. Hurrah for me! So when my local fabric shop e-mailed me a 3-for-1 coupon for Butterick and Vogue, I figured I earned it and added a new trio to the still-high heap.

Ah, bliss! Sew much to sew.

Amount fabric required: 
one and a half yard off a 45″ wide bolt.

Jacob’s Ladder Wall Quilt

Image

I sprinkled in a few green squares for interest and flipped the light/dark order at bottom as a nod to imperfection.

Jacob’s Ladder packs a graphic punch in monotone, the light and dark squares advance and recede in a classic, crooked zig-zag.

The simple pattern is a great choice for a novice like me. All I had to do was arrange my two-inch squares and four-inch triangles in the correct sequence to create the ladder.

Image

I got my instructions for this 20″ x 20″ quilt sample from Marilyn Walker’s book Ontario Heritage Quilts, which I enjoyed for her tribute to talented early quilters and for the imaginative photographs. Good tips on piecing are included at the back.

I chose to hand quilt, which requires patience and commitment.

Image

For future generations, include a patch on the back with the name of the quilter, the year it was completed and the pattern used.

Image

Before your first quilt is finished, you will be planning the colours for the next.

Hand stitches create a delicate broken line of thread, much softer in appearance than the precision of a machine stitch (see upper right diamond in photo).

I plan to hang my finished square on the staircase wall. All who ascend and descend can imagine moving between the up-down-up steps of Jacob’s ladder.

Amount fabric required:  

  • One half yard burgundy
  • One half yard white.
  • Batting  to fit 20″ x 20″
  • One yard broadcloth for backing, which is wrapped around the edges to form mock binding.

McCalls M6613 Shirt with Yoke

Pattern from the heap

McCall’s M6613 sat in my heap of unopened patterns for too long. I’m glad I finally made this as it is really comfortable and easy to make.

I'll wear the short sleeves rolled up, otherwise it looks like I'm wearing a man's shirt.

I’ll wear the short sleeves rolled up, otherwise it looks like I’m wearing a man’s shirt.

Because this is really a fitted man’s shirt design, you may want to customize it a bit so it suits a woman’s wardrobe. For my shape I added front bust darts, and I probably could have narrowed the back, now that I look at it on.

Wear it alone in a crisp broadcloth, or wear it open in front over a tank top in a lightweight cotton or sheer. Definitely intended for comfort, it’s a terrific wardrobe addition for physical folks who work in shops, factories, studios, gardens etc.

Mix and match the elements you like most. I chose the curved bottom hem, which I feel is more feminine, and took time to top-stitch detail on the pockets. You get a centre pleat on the back.

Mix and match the elements you like most. I chose the curved bottom hem, which I feel is more feminine, and took time to top-stitch detail on the pockets. You get a pleat on the centre back.

I also sewed my buttons closer together up the front to prevent any gaping gaps. Not likely, however, as the shirt is roomy.

This pattern includes excellent instructions on how to achieve a neat, curved hem.

This pattern includes excellent instructions on how to achieve a neat, curved hem.