Category Archives: Fabrics

Mock Knit Fabric Blouse

This isn’t just a flat print of a knit. This material actually has a raised profile; it has the illusion of knitted ribbon!

shirt collar

Here is the Butterick B5218 blouse. I used solid black broadcloth on the collar to accent the main, mock-knit fabric.

Interesting, but a real challenge to send through my sewing machine. Consequently, I ended up hand-sewing some bits, such as pockets and sleeve hems. I just didn’t like the deep impression the machine stitches left on the material’s delightful terrain.

Once satisfied that the fabric would not fray, I left the seams unfinished (no worries). Unfortunately, the needle jammed and skipped, so I placed stiff, tearaway tissue on both top (against presser foot) and bottom (against feed dogs) and that sent it through smoothly.

pattern marks in coloured tape

It was impossible to chalk in pattern marks on such bumpy fabric. I ended up cutting shapes from painter’s tape instead.

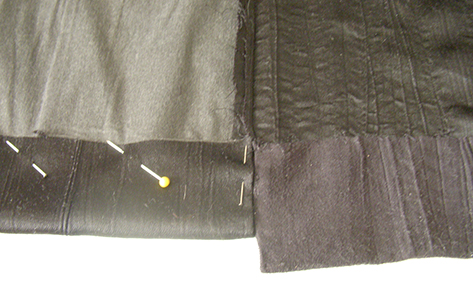
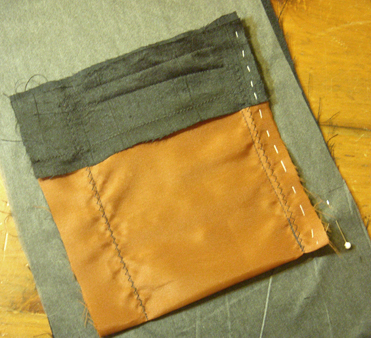
In places where I did choose to hand-sew, for instance the sleeve hems, I marked a very straight path with pins, 5/8″ from edge, and followed that with close, even stitches. The pockets were also hand sewn in place. That was a longer path than the shoulders, but required less precision and the stitch length was longer. (Unless you plan to keep sand in your pockets, the seams need not be finished to micro-perfection.)

alter pattern shoulder

I narrowed the drop shoulders by cutting both front and back pieces diagonally from shoulder notch down to the armhole notch. Then I lapped the slice at shoulder.

In the end, I like the drape of my final blouse. All-season suitable, it combines a wintry, knitted look, minus the bulk.

Amount of fabric required for short-sleeve Butterick B5218: one and a half yards main colour, and 1/3 yard of contrasting black broadcloth for collar.

Amount of fabric required for short-sleeve Butterick B5218: one and a half yards main colour, and 1/3 yard of contrasting black broadcloth for collar.

Sewing with faux fur

Lots of Possibilities with Fake Fur

It seems everyone is spicing up their wardrobe this season with fun fur. It’s not a difficult textile to work with, so go ahead and experiment. Maybe choose an imitation shearling to trim your leg-warmers, or put a long-hair accent pom-pom on your scarf, or make fuzzy ear muffs. Continue reading

Make a Twin Pocket Burlap Tote Bag

This tote started with a paper mock-up. I folded up a small sample out of standard letter size sheet and then scaled up its dimensions 3.44 times when cutting the fabric.

So, the pattern is basically a 16″ x 32″ rectangle of tight-weave burlap in brown. I used purple broadcloth for the lining and cut it one inch bigger all around.

A round of canvas strap is laid atop lining, burlap and pocket patch and it all folds up pretty much like a paper bag.

A round of canvas strap is laid atop lining, burlap and pocket patch and it all folds up pretty much like a paper bag.

Lay both burlap and lining together flat and pin or baste to keep together. Take about three yards of woven strap and lay this in an oval on top, just like a racetrack. Continue reading

Hem the spring coat plus lining

Before advancing to the final stage of hemming the coat, you need to put on the buttons. I chose to make vertical buttonholes for this spring coat; I figured it would look neater as they are big buttons.

A word of caution regarding the fabric:  Sadly, I liked the reverse satin side of this mock suede polyester so much that I used it as the "right" side for the collar. Since then, I have learned that it fuzzes up very easily, even with careful handling. Any roughness on your fingers will snag and pill up the sheen.

A word of caution regarding the fabric: Sadly, I liked the reverse satin side of this mock suede polyester so much that I used it as the “right” side for the collar. Since then, I have learned that it fuzzes up very easily, even with careful handling. Any roughness on your fingers will snag and pill up the sheen.

To determine the ideal placement for four buttons, wear the jacket. Place a pin first at the bust, and then the waist. Remove the jacket and lay it on the work table. Add the third button in between the first two, and then place the fourth the same distance away at the bottom of the row.

Hemming the coat and lining – Simplicity 4014

When hemming, I like to start off with an evenly trimmed bottom edge. Remember, we had to sew five panels together to make the jacket and it’s likely that they will stagger a bit once assembled. And if you are shorter than average, the coat may need a good clip.

So hang the buttoned coat, preferably on your twin sister or dress form but a hanger will do. Pin up the left and right fronts where you like, making sure they are even. Then measure up from the floor to where you pinned, and  keep that measurement consistent as you chalk mark all around the coat at each seam. I have tried to cut garments while they hang, but have had nothing but off-course disasters. So I forego the speedy snip, and only chalk or pin where I intend to cut on a flat surface.

Now put the coat on a table and pin up folding at your chalk marks. Try it on again. If you are bigger in the front or the back it may need a bit of adjustment.  But once you have it where you like,  gently press, and then sew.

I choose to hand stitch this hem so there would not be an obvious stitch line. On some coats you may like to see the stitch line, as in a trench coat.  Once the outer hem is up, hang it again, and chalk mark the lining (which will be visibly hanging lower) about an inch down from the now finished hem of the coat. Place flat to cut at the chalk mark. Turn up, making the folded edge a good 3/4 inch up from the bottom of the coat. There will be no chance of the lining drooping out.

Don't expect a crisp crease when ironing this mock suede polyester. Use a damp cloth, and press only on the wrong side of the fabric. Don't linger with the iron. You risk flattening the crinkle texture pattern if there is too much direct heat.

Don’t expect a crisp crease when ironing this mock suede polyester. Use a damp cloth, and press only on the wrong side of the fabric. Don’t linger with the iron. You risk flattening the crinkle texture pattern if there is too much direct heat.

Stay-stitch sleeve and attach to jacket

Before attaching the sleeve to the spring jacket, I need to help the fabric take on the curved shape of the shoulder. We can do this with a double row of stay stitching and yanking the loose thread ends.

  • Stitch along the shoulder seam line between pattern notches using a long machine basting stitch.
  • Then, sew a second parallel line a quarter inch away inside the seam allowance.
  • Pull the threads to distribute the small gathers evenly.  Continue reading

Placing the Welt Pocket in Jacket Lining

I’m glad I took time to sew a test pocket using my fabric scraps. The faux suede has a slick satin back and I needed to know how it would behave before I add it to the jacket lining.
My conclusion was to add acetate for the pocket bag to reduce bulk and avoid ridges when ironing. I also chose to make the welt wider for style reasons. And I went with a non-fusible facing because it will not flatten the ripples of the fabric pattern. Above is the final pocket in the lining, ready for assembly.

Sewing with crinkle cotton

Crinkle Cotton is a comfortable fabric for hot summer days. The micro pleating provides stretch and the natural fibre is light-weight and breathable. The side story of many summer whites is they are sheer and the modest may worry about undergarments showing through. A good choice then is Very Easy Vogue pattern 8656, which is a mid-thigh tunic (reminiscent of a school uniform) over wide-leg, elastic waist pants. The long tunic covers the seat of the pants completely, giving the wearer an extra layer of cover.

Of course, pre-wash your fabric before sewing and steam out any creases rather than pressing. Do this by hanging up the cloth and aiming the blast from your iron vertically. You don’t want to flatten those perma-pleats.

Resist stretching the width of the fabric when pinning and cutting the fabric, you will want all the pleats in relaxed mode, as that is how it will hang when worn.

Stay-stitch around the neck and armhole openings before attaching the inner binding; you are aiming for a non-stretchy neck edge so it will never gape.